Bake Fluffy Focaccia Today: The Secret to No-Knead Deliciousness
Imagine a golden-brown slab of bread, glistening with olive oil, adorned with fragrant herbs, and boasting an impossibly tender, airy crumb. Sounds like something only a seasoned baker could achieve, right? Think again! We're here to reveal the secret to making incredibly light and utterly delicious focaccia right in your own kitchen, with virtually no kneading required. This isn't just another bread recipe; it's an invitation to experience the pure joy of
Easy No-Knead Focaccia: A Same-Day Recipe for Beginners that will quickly become a cherished favorite. Get ready to impress your family and friends with an authentic Italian bread that's surprisingly simple to master.
For years, focaccia has been a go-to for gatherings, consistently disappearing faster than any other dish on the table. This isn't just anecdotal; it's the result of countless tests and tweaks, refining the perfect flour-to-water ratio to ensure a reliably perfect texture and an incredibly easy process. Whether you're a complete novice to yeast baking or a seasoned pro looking for a simpler approach, this
easy homemade focaccia recipe promises consistent excellence. Forget the stand mixer and the strenuous workout; a few gentle folds are all it takes to build a magnificently bubbly, fluffy structure.
Why You'll Fall in Love with This Easy Homemade Focaccia Recipe
Preparing bread can often feel intimidating, but this focaccia recipe breaks down every barrier, making it an absolute delight for anyone and everyone. Here’s why this particular approach stands out as the ultimate path to perfect focaccia:
- Same-Day Satisfaction: Unlike many bread recipes that demand overnight proofing, this easy homemade focaccia can be mixed, risen, and baked all within a single afternoon, typically under four hours. Its bubbly, airy structure develops beautifully through a series of short, strategic resting periods, meaning you don't have to plan days in advance for this delightful treat.
- Perfect for Beginners: If you've ever shied away from baking with yeast, consider this your welcoming committee. Zero prior experience with yeast breads is needed to achieve spectacular results. The process is intuitive, forgiving, and designed to build your confidence with every step.
- No Special Equipment Required: Ditch the bulky stand mixers and dough hooks! All you need is a large mixing bowl, a sturdy spoon or spatula, and your hands. This recipe champions simplicity, proving that incredible bread doesn't require a commercial kitchen setup.
- Mostly Hands-Off: While there are a few quick "stretch-and-fold" sessions and the satisfying dimpling, the vast majority of the work is done by time. The dough ferments and develops its complex flavors and beautiful texture as it rests, leaving you free to enjoy your day.
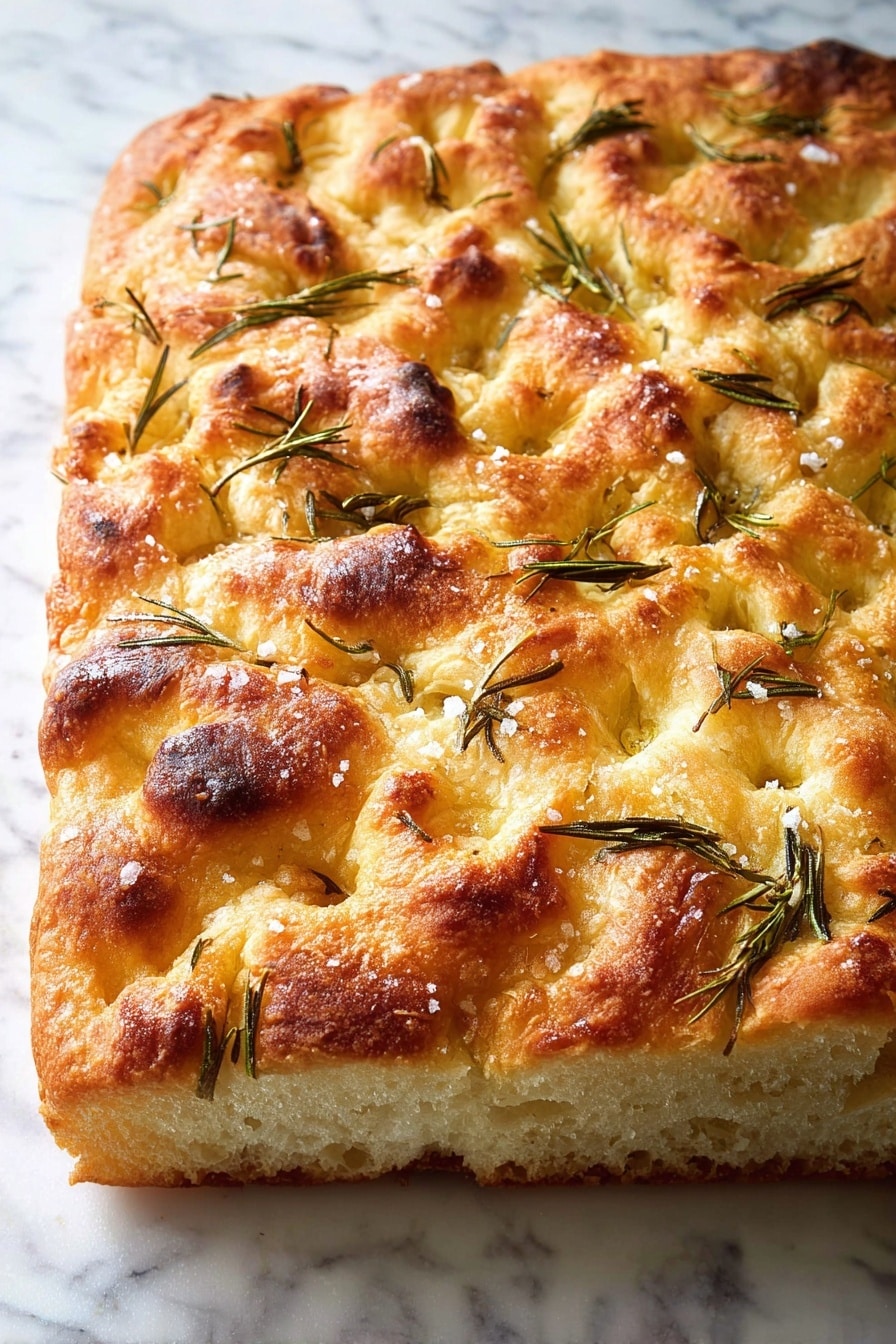
- Irresistible Texture: The hallmark of truly great focaccia is its contrast – a wonderfully crisp, golden-brown crust (thanks to ample olive oil) that gives way to an incredibly tender, pillowy-soft interior. This recipe nails that balance every single time, offering a delightful chewiness that's simply addictive.
- Endlessly Customizable: Focaccia is a blank canvas for your culinary creativity. From classic rosemary and flaky sea salt to sun-dried tomatoes, olives, roasted garlic, or even a sprinkle of Parmesan, the topping possibilities are limited only by your imagination. It’s a joy to personalize your loaf!
Essential Ingredients for Your Perfect Focaccia
The beauty of this
easy homemade focaccia lies in its humble ingredients, each playing a crucial role in developing its signature texture and flavor. Opt for quality where you can, but rest assured, even pantry staples will yield fantastic results.
- All-Purpose Flour: This workhorse flour provides the fundamental structure and delightful chew of our focaccia. While you can certainly use bread flour for a slightly chewier crumb, good quality all-purpose flour is perfectly adequate and often preferred for its tender results in this recipe.
- Water: The lifeblood of your dough, water activates the yeast and hydrates the flour, transforming it into a cohesive, pliable mass. Aim for warm water, around 105-115°F (40-46°C), especially if using active dry yeast, as this temperature provides the ideal environment for yeast activity. A kitchen thermometer can be a helpful tool here.
- Yeast: The magic behind the rise! Both active dry yeast and instant yeast work wonderfully. If using active dry, you'll need to "bloom" it in warm water for about 5 minutes until foamy, indicating it's alive and active. Instant yeast, on the other hand, can be stirred directly into the warm water with no waiting period. Don't be intimidated by yeast; it's quite resilient!
- Sea Salt: More than just a flavor enhancer, salt plays a critical role in strengthening the gluten structure of the dough and controlling yeast fermentation. High-quality sea salt (or kosher salt) adds a superior flavor compared to standard table salt. Don't skip it!
- Extra Virgin Olive Oil: This is arguably the most important non-flour ingredient. Good quality extra virgin olive oil contributes richness and depth of flavor to the dough, prevents sticking, and, most importantly, creates that irresistible crisp, golden crust. Drizzle generously both into the dough and over the surface before baking – it truly makes a difference. You don't need the most expensive bottle, but choose an olive oil you genuinely enjoy the taste of.
- Optional Toppings: This is where your creativity shines!
- Classic Herbs: Fresh rosemary, thyme, or oregano are timeless choices.
- Flaky Sea Salt: A final sprinkle not only adds visual appeal but also bursts of savory flavor and texture.
- Olives: Kalamata, Castelvetrano, or any briny olive halves pressed into the dough.
- Garlic: Thinly sliced raw garlic, roasted garlic cloves, or garlic-infused olive oil.
- Cheese: A sprinkle of Parmesan or crumbled feta.
- Other Ideas: Cherry tomatoes, caramelized onions, chili flakes, pesto swirls, or even thinly sliced potatoes.
Step-by-Step: Mastering Your No-Knead Focaccia Dough
The beauty of this
Simple Homemade Focaccia: Master This Easy 4-Hour Recipe lies in its simplicity. Follow these steps for perfect results every time.
- Activate the Yeast (if necessary): In a large mixing bowl, combine your warm water (105-115°F / 40-46°C) with the active dry yeast. Give it a gentle stir and let it sit for 5-7 minutes. You should see a foamy layer develop on the surface – this confirms your yeast is alive and ready to work! If using instant yeast, simply stir it into the warm water and proceed immediately.
- Mix the Dough: To the yeast mixture, add the all-purpose flour, sea salt, and about half of your extra virgin olive oil. With a sturdy spoon or rubber spatula, mix until all the flour is hydrated and you have a shaggy, sticky, cohesive dough. Be thorough, ensuring there are no dry pockets of flour left at the bottom of the bowl – those sneaky bits can hide! The dough will be quite wet, almost like a thick batter, which is exactly what we want for that airy crumb.
- First Rest & Fold: Drizzle the remaining half of your olive oil over the top of the dough. Cover the bowl tightly with plastic wrap or a damp kitchen towel. Let the dough rest at room temperature for 30 minutes. After the rest, perform your first "stretch and fold." Lightly oil your hands, then grab a section of the dough from one side, stretch it gently upwards, and fold it over towards the center. Rotate the bowl a quarter turn and repeat this process 3-4 more times. This simple action helps build gluten structure without any vigorous kneading.
- Subsequent Rests & Folds: Re-cover the bowl and let the dough rest for another 30 minutes. Repeat the stretch-and-fold process. You’ll notice the dough becoming smoother, more elastic, and developing more air bubbles. Continue this cycle of 30-minute rests followed by 3-4 stretch-and-folds for a total of 3-4 times. Each time, the dough will become more manageable and visibly puffy.
- The Final Rise & Dimpling: After the last set of folds, the dough should be noticeably larger, bubbly, and jiggle gently when the bowl is moved. Generously grease a 9x13-inch baking pan with extra virgin olive oil – don't be shy; this is key for the crisp bottom crust! Gently pour or scrape the dough into the prepared pan. Lightly oil your fingertips, then gently press them deeply into the dough, creating those characteristic focaccia dimples. Try to press all the way down to the pan without tearing the dough. This creates pockets for olive oil and toppings, and helps achieve that airy texture.
- Toppings & Final Proof: Drizzle more olive oil over the dimpled dough. Now's the time to add your chosen toppings – sprinkle with flaky sea salt, fresh rosemary, or whatever your heart desires. Cover the pan loosely with plastic wrap or a damp towel and let it proof at room temperature for another 30-60 minutes, or until it looks noticeably puffy and springy. Meanwhile, preheat your oven to 425°F (220°C).
- Bake to Golden Perfection: Place the focaccia in the preheated oven and bake for 20-25 minutes, or until the top is beautifully golden brown and the crust is crisp. The internal temperature should be around 200-210°F (93-99°C).
- Cool & Serve: Once baked, immediately transfer the focaccia from the pan to a wire rack to cool slightly. This prevents the bottom from getting soggy. Slice into generous portions and serve warm. It’s glorious on its own, perfect for dipping in olive oil, or as a side to any meal.
Tips for Focaccia Success & Flavor Variations
To elevate your
easy homemade focaccia even further, consider these tips and unleash your creativity with toppings:
- Don't Rush the Rise: While this is a same-day recipe, don't skimp on the resting periods. They are crucial for gluten development and flavor. A slightly longer final proof can sometimes lead to an even airier crumb.
- Embrace the Stickiness: A wet, sticky dough is what makes this focaccia so incredibly light and bubbly. Resist the urge to add more flour during the mixing stage. If your hands get too sticky during the folds, lightly oil them instead of dusting with flour.
- Quality Olive Oil Matters: While you don't need the most expensive bottle, using a good quality extra virgin olive oil you enjoy the taste of will significantly enhance the focaccia's flavor, both in the dough and as a topping.
- Troubleshooting Dense Focaccia: If your focaccia turns out dense, it could be due to several factors: yeast that wasn't active, water that was too hot or cold, not enough resting/rising time, or too much flour added. Ensure your yeast is fresh and follow temperature guidelines closely.
- Storage: Focaccia is best enjoyed fresh on the day it's baked. However, leftovers can be stored at room temperature in an airtight container for 1-2 days, or frozen for up to a month. To reheat, simply warm in a 350°F (175°C) oven for 5-10 minutes until crisp again.
- Serving Suggestions: Beyond enjoying it plain, focaccia makes an excellent base for sandwiches, is perfect for dipping into soups or stews, or can be served as an appetizer with cheese and charcuterie.
- Creative Topping Combos:
- Tomato & Basil: Halved cherry tomatoes with fresh basil post-bake.
- Caramelized Onion & Thyme: Sweet, slow-cooked onions with fresh thyme leaves.
- Roasted Garlic & Parmesan: Soft, mellow roasted garlic cloves pressed into the dough with a sprinkle of cheese.
- Pesto Swirl: Dollop small spoonfuls of pesto onto the dimpled dough and gently swirl with a knife.
- Spicy Chili Oil: A drizzle of chili oil over the top for a kick.
This
easy homemade focaccia recipe demystifies the art of bread baking, proving that truly exceptional results are within reach for everyone. With just a handful of common ingredients and a surprisingly simple, mostly hands-off process, you can create a loaf that's bursting with flavor and boasts an irresistible texture. So, clear your counter, gather your ingredients, and prepare to fill your home with the glorious aroma of freshly baked bread. You're just a few steps away from experiencing the tender, golden deliciousness of no-knead focaccia. Happy baking!